Essential Supplies and Prep: Real vs. Faux Pumpkins
Looking for pumpkin painting ideas? Start with cute kid-friendly motifs like kawaii animal faces, sprinkle donuts, and thumbprint ghosts; spooky Halloween designs such as cracked porcelain skulls, blood-orange drips, and oversized monster eyeballs; elegant fall décor trends including quiet luxury monochrome, sage green checkerboard, and botanical line art; or artistic textured finishes like sponge ombré, water marbling, and faux terracotta. Painting offers an expressive, low-mess alternative to scooping out sticky pumpkin pulp, and it gives you complete freedom over your palette and design style without the risk of an intricately carved masterpiece collapsing after three days.
Before dipping your brushes into paint, deciding between an organic gourd and a craft foam pumpkin sets the tone for your project. Both offer unique benefits depending on whether you want a seasonal centerpiece or a keepsake you can pack away for future autumns.
| Feature | Real Pumpkins | Faux / Craft Pumpkins |
|---|---|---|
| Durability | 8 to 12 weeks when kept whole and sealed | Indefinite; reusable year after year |
| Surface Texture | Natural ridges, organic bumps, waxy skin | Uniform, smooth foam or resin surface |
| Prep Required | Washing, vinegar/alcohol wipe-down | Light dusting; optional base primer |
| Best Paint Adhesion | High with proper degreasing | Excellent out of the box |
| Storage Potential | Compostable at end of season | Packs easily into storage totes |
| Best Use Case | Porch displays, harvest gatherings | Heirloom decor, intricate art pieces |
For those looking to craft high-end accents, exploring 39 Stunning Elegant Pumpkin Painting Ideas for Chic Fall Décor 2026 offers great inspiration for pairing upscale metallic finishes and muted tones with craft surfaces.
Preparing Real and Craft Pumpkins
Proper surface preparation is the secret to preventing peeling, cracking, or premature decay. Real pumpkins produce a natural waxy exterior designed to protect the fruit, but that same protective layer can repel water-based paints.
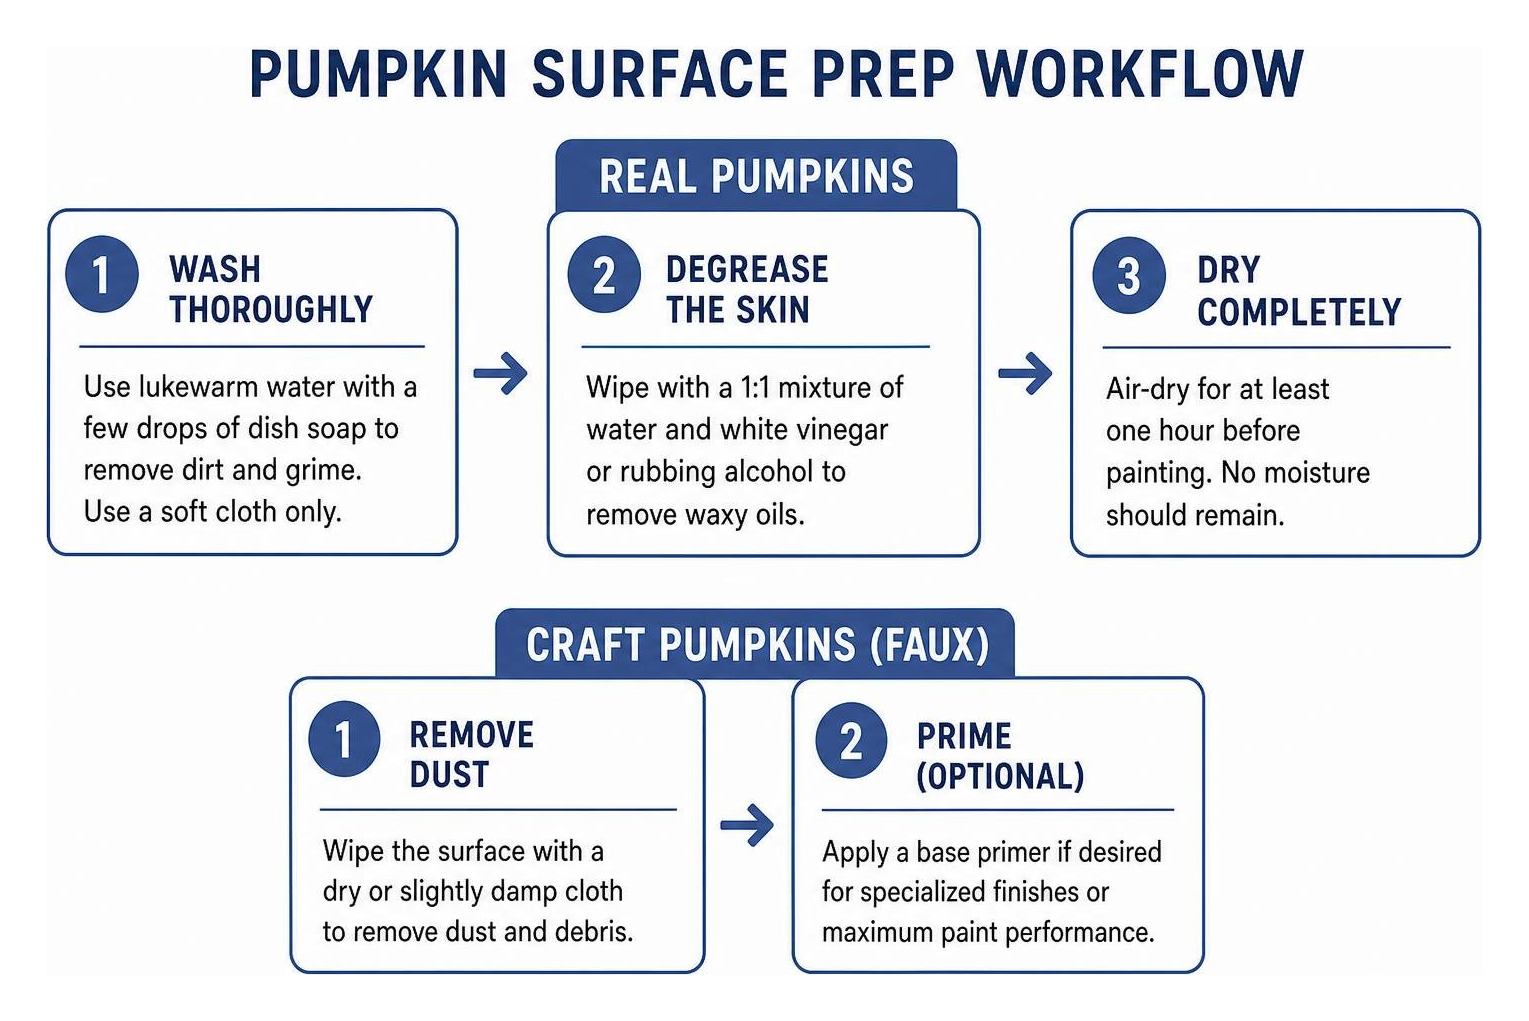
To prep a real pumpkin:
- Wash Thoroughly: Soak a soft cloth in lukewarm water mixed with a few drops of dish soap to remove dirt and field grime. Avoid abrasive scouring pads that might puncture the rind.
- Degrease the Skin: Wipe down the entire surface with a 1:1 mixture of water and white vinegar or a cotton pad dampened with rubbing alcohol. This strips away natural oils and waxy residue, creating optimal surface tension for paint adhesion.
- Dry Completely: Allow the gourd to air-dry fully for at least an hour. Trapping moisture under paint can accelerate internal rotting.
For craft foam pumpkins, the process is even simpler. Wipe the surface with a microfiber cloth to remove dust particles. If your foam pumpkin has an overly glossy factory finish, a thin coat of matte spray primer or gesso will help acrylics grip without streaking.
Choosing the Right Paints, Tools, and Sealants
Selecting high-quality supplies ensures your artwork stays vibrant throughout the crisp autumn weeks:
- Paints: Acrylic craft paints are the gold standard for pumpkin decorating. They dry quickly, offer vibrant pigmentation, and remain flexible enough to adhere without flaking. Chalk paint is another superb choice, producing a velvety, ultra-matte texture that feels distinctly upscale.
- Brushes and Applicators: Keep a varied toolkit handy. Synthetic flat wash brushes work best for base coats, angled detail brushes tackle sharp outlines, and round foam stipplers or cosmetic sponges create seamless gradients. Paint markers and acrylic paint pens are essential for lettering, spiderwebs, and fine linework.
- Fixatives and Sealers: Protect your finished work from rain, frost, and UV exposure. A clear acrylic aerosol sealer (available in matte, satin, or gloss) locks in pigment and keeps your handiwork pristine all season long.
30 Creative Pumpkin Painting Ideas for Every Style
With your supplies ready, here is our curated collection of 30 inspiring designs organized by aesthetic, mood, and skill level.
Easy and Cute Pumpkin Painting Ideas for Kids
These beginner-friendly concepts are low-stress, mess-managed, and perfect for young artists:
- Kawaii Animal Faces: Paint a mini pumpkin in soft pastel pink, butter yellow, or sky blue. Once dry, use a black acrylic marker to draw minimalist curved eyes, rosy blushed cheeks, and a tiny smile.
- Sprinkle Donut: Paint the bottom third of a flat-shaped pumpkin in warm dough beige and the top two-thirds in glossy pastel pink or chocolate brown. Finish by painting bright, multicolored rectangular dashes as sprinkles.
- Mini Candy Corn Trios: Section small gourds into three horizontal stripes—white on top, vibrant orange in the middle, and sunny yellow at the base.
- Thumbprint Ghosts: Coat a medium pumpkin in deep navy or forest green. Have children dip their thumbs in white washable acrylic, press prints around the pumpkin, and dot on tiny black eyes with a toothpick once dry.
- Modern Polka Dots: Apply a clean white base coat, then use round foam pouncers dipped in metallic gold, copper, or warm rust paint to stamp symmetrical dots over the surface.
- Friendly Monster Silhouettes: Coat the pumpkin in bright chartreuse or electric purple, then paint single oversized googly eyes and goofy, jagged grins.
- Abstract Confetti Splash: Give a pumpkin an eggshell-white coat, then flick a brush loaded with assorted bright acrylics across the surface for a playful splatter-paint finish.
Spooky and Funny Pumpkin Painting Ideas for Halloween
Bring theatrical flair and humor to your porch with these expressive Halloween themes:
- Cracked Porcelain Skull: Paint a smooth pumpkin bone-white, sketch hollow eye sockets and nasal cavities in charcoal black, and add fine, spidering grey hairline cracks radiating from the stem.
- Blood-Orange Drip Effect: Paint a solid matte black base. Invert a bottle of thick, crimson or neon-green acrylic paint along the stem rim, allowing gravity to pull dripping rivulets down the natural grooves.
- Spa Day Cucumber Pumpkin: Paint a calming mint-green base coat, draw a white face mask outline with relaxed closed eyelashes, add two painted green cucumber slices over the eye area, and wrap a real hand towel around the stem like a turban.
- Glow-in-the-Dark Constellations: Coat a large pumpkin in midnight indigo. Use luminous glow-in-the-dark paint pens to map out authentic celestial patterns, stars, and crescent moons.
- Beetlejuice Bold Stripes: Section off wide vertical ribs using painter’s tape and paint alternating, stark black and crisp white stripes inspired by classic gothic cinema.
- Oversized Monster Eyeball: Paint a round pumpkin pure white, outline a massive iris in bloodshot hazel, green, or violet, and use fine crimson pens to trace squiggly veins branching outward.
- Goofy Emoji Expressions: Coat smaller pumpkins in vibrant canary yellow and render favorite digital expressions, from winking faces to playful grimaces.
Elegant and Aesthetic 2026 Fall Décor Trends
Elevate your interior styling with these refined, contemporary artistic motifs:
- Quiet Luxury Monochrome: Paint a trio of assorted gourds in tonal shades of stone, warm taupe, and creamy alabaster, leaving the stems in their raw, organic wood finish.
- Sage Green Checkerboard: Using the pumpkin’s natural ribs as vertical guides, map out a delicate sage green and ivory checkerboard pattern around the circumference.
- Gold Leaf Ridge Accents: Paint an uncarved pumpkin in deep charcoal or velvety off-white. Apply thin sizing glue along three or four prominent vertical grooves and press delicate sheets of variegated gold leaf into the crevices.
- Dark Academia Plaid: Apply an espresso-brown or hunter-green base, then overlay overlapping tartan lines in burnt sienna, mustard yellow, and cream using a flat edge brush.
- Botanical Line Art: On an unpainted natural white gourd (such as a Luminary pumpkin), use a fine black micro-pen to draw minimalist botanical sprigs, eucalyptus leaves, and delicate fern fronds.
- Blue and White Chinoiserie: Inspired by antique porcelain, paint a pristine white base and render intricate floral vignettes, scrollwork, and birds using cobalt blue paint.
- Textured Farmhouse Impasto: If you enjoy rustic home decor, learning techniques like Farmhouse Pumpkin Painting — Jackie Partridge Art can show you how to layer thick, neutral acrylics with a palette knife for rich, tactile depth on flat surfaces and dimensional crafts alike.
- Blush and Burgundy Botanical Vignette: Blend a soft ballet-slipper pink background and paint deep wine-colored peony silhouettes across the front curve.
Artistic Effects: Ombre, Marbling, and Textured Finishes
For makers seeking hands-on artistic techniques that look professionally crafted:
- Sunset Sponge Ombré: Starting at the base with deep terracotta, use a damp cosmetic wedge to blend upward into warm pumpkin orange, soft peach, and finally cream at the stem.
- Nail Polish Water Marbling: Fill a disposable bucket with room-temperature water. Drizzle complementary shades of quick-dry nail polish (such as black, metallic copper, and turquoise) onto the water’s surface, swirl with a toothpick, and dip the lower half of your pumpkin for a swirled marble dip.
- Faux Terracotta Baking Soda Finish: Mix two tablespoons of baking soda into half a cup of rust-colored acrylic paint. The resulting mixture creates a thick, gritty paste that dries into a porous earthenware texture.
- Alcohol Ink Galaxy: On a glossy white craft pumpkin, drop dark blue, magenta, and purple alcohol inks, blowing them gently with a straw to create nebulous celestial clouds. Highlight with tiny white paint splatters for stars.
- Color-Blocked Angles: Apply low-tack painter’s tape diagonally across the pumpkin and paint half in deep navy and the other in dusty rose for a modern graphic statement.
- Matte Velvet Midnight: Spray a pumpkin with ultra-matte black chalk paint, then dust the shoulders lightly with iridescent velvet flocking powder while the final coat remains tacky.
- Pressed Botanical Decoupage: Paint a crisp linen background, arrange dried autumn leaves or pressed clover onto the skin, and seal them flush with multiple coats of matte decoupage medium.
- Metallic Dip Base: Keep the top half of your pumpkin natural or matte white, tape off a crisp horizontal line near the bottom third, and paint the lower base in radiant liquid copper or brass.
Pro Techniques: How to Seal and Preserve Painted Pumpkins
One of the greatest benefits of painting rather than carving is longevity. While carved jack-o’-lanterns quickly fall victim to mold and dehydration within 3 to 7 days, a properly sealed, unpunctured painted pumpkin can easily last 8 to 12 weeks.
To ensure your painted creations endure from early October past Thanksgiving:
- Seal Front to Stem: Once your paint has cured for 24 hours, apply two light, even coats of a UV-resistant clear acrylic sealer. Choose a matte finish to preserve earthy chalk paint textures, or opt for gloss if you want rich, saturated contrast.
- Elevate Off Damp Surfaces: Moisture accumulating beneath a pumpkin’s base is the primary cause of rot. Place your finished pumpkins on a porch riser, wooden crate, or decorative trivet rather than directly on cold, damp concrete or wet soil.
- Manage Temperature and Sunlight: Uncarved pumpkins fare best in cool, shaded conditions between 50°F and 65°F. Protect them from harsh afternoon sunlight (which softens the skin) and freezing overnight frosts.
Hosting a Fall Pumpkin Painting Party

Pumpkin painting is an ideal social craft, pairing seasonal festivity with relaxing creativity. Whether you are gathering friends for an autumn wine tasting or organizing a family-friendly weekend afternoon, a well-structured setup keeps the event joyful and tidy.
Setting Up the Creative Station
- Protect Your Work Surfaces: Cover sturdy outdoor picnic tables or dining tables with brown butcher paper or heavy canvas drop cloths. Tape paper plates or ceramic tiles down as individual mixing palettes.
- Organize Brushes by Technique: Set out jars of water, paper towels, and assorted brush sets where guests can easily reach them. Provide paint pens for those who prefer illustrating over freehand brushwork.
- Serve Seasonal Refreshments: Elevate your painting session with local Hudson Valley craft beverages, fresh apple cider doughnuts, and a curated autumn cheese board.
If you love pairing creative crafts with regional farm outings, our area is packed with inspiration. You can explore interactive community workshops like a Paint & Sip at Applewood Winery, bring your four-legged companions out to Pooches & Pumpkins at Stone Ridge Orchard, or browse our regional calendar of Fall Events to immerse yourself in the harvest season.
Frequently Asked Questions About Pumpkin Painting
What paint lasts longest on real pumpkins?
Outdoor acrylic craft paint and multi-surface acrylic enamels offer the longest lifespan on real pumpkins. These paints contain flexible synthetic binders that expand and contract with temperature shifts without cracking. Chalk paint also adheres exceptionally well to waxy surfaces, though it requires a water-resistant clear sealer if displayed outdoors in rainy weather.
Do you have to prime a pumpkin before painting?
Priming is not strictly necessary if you thoroughly clean and wipe the pumpkin with rubbing alcohol or a vinegar solution. However, if you are painting light pastel colors, bright yellow, or crisp white over a deep orange pumpkin, applying a single base coat of white acrylic primer (or gesso) will reduce the number of paint layers needed.
How can you keep painted pumpkins from rotting outdoors?
To keep pumpkins fresh all season, choose firm gourds with intact stems and no visible soft spots. Never puncture or carve into the rind. Wipe the shell clean, let it dry thoroughly before decorating, and seal your finished artwork with a clear acrylic aerosol spray. Keep the pumpkins elevated on covered porches away from pooled rainwater, direct sunlight, and freezing temperatures.
Conclusion
Decorating for autumn is all about celebrating the harvest, exploring your creativity, and making your living space feel warm and festive. Pumpkin painting offers an accessible, mess-free craft that invites artists of every age and skill level to participate. From delicate sage checkerboards and radiant gold leaf accents to cheerful kawaii expressions and spooky skeletons, the creative possibilities are endless.
As you plan your seasonal outings and craft days, take time to celebrate the historic harvest traditions of our region. For a deeper look at agricultural stewardship and innovative cidermaking, explore our feature on taking tradition forward at Angry Orchard Cider House. Gather your paints, pick out your favorite gourds, and enjoy bringing these colorful fall ideas to life!